
Choose makeup for a round face by separating edge shadow, higher blush, center light, and eye direction before checking the result in motion. Open the detector
makeup for round face
For makeup for round face, start by placing definition around the outside, lifting color toward the temples, and keeping the brightest points near the center line. The goal is not to hide full cheeks. It is to decide where shadow, color, and light should travel, then check the result in the same light while you smile and turn.
Make a map you can erase
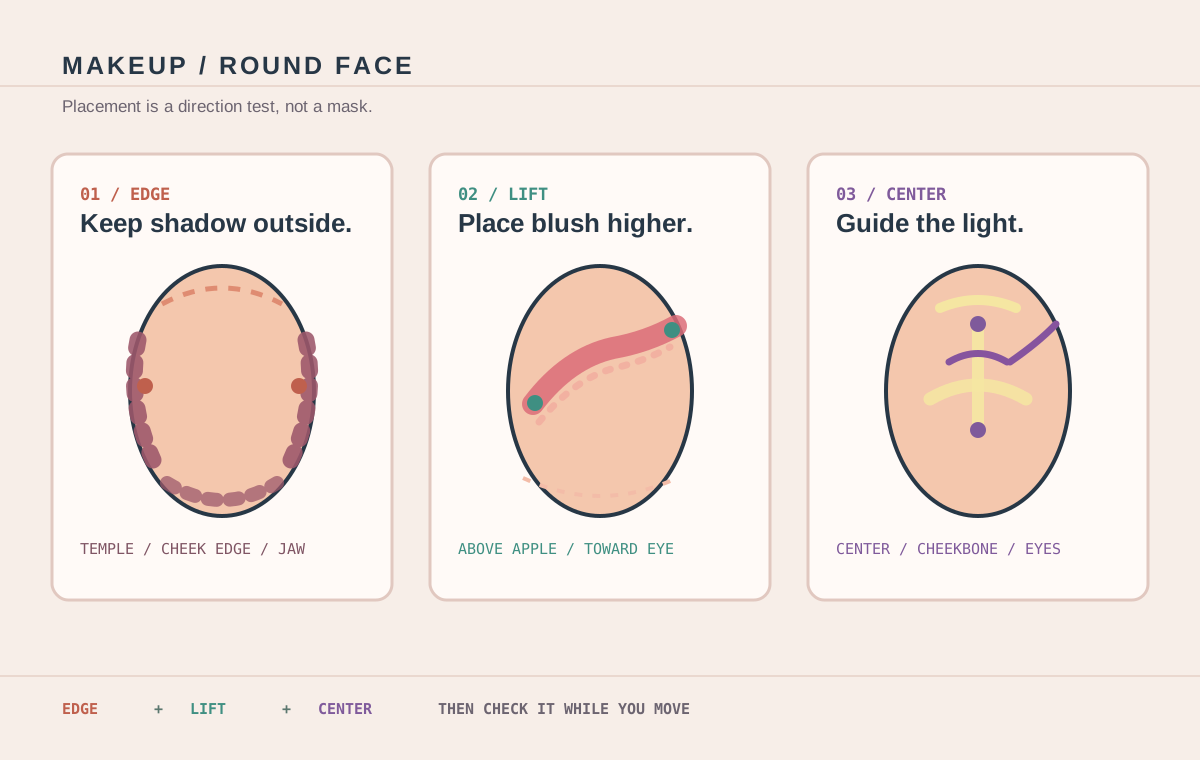
Before opening a palette, mark three jobs on a clean face or a thin base: edge, lift, and center. Edge is the outer temple, the side of the cheek, and the jaw route. Lift is the higher blush path toward the outer eye. Center is the bridge, the middle of the forehead, the top of the cheekbone, and the chin only when the finish still feels open.
This map is more useful than trying to make every part of the face look narrower. A round pattern often has a similar face length and width, fuller cheeks, and a softer jaw turn, but the label does not tell you where your own cheek begins or how your products behave. Use the detector and the face-shape reading guide as starting references, then let your placement test decide.
Put shadow beside the face, not across it
Use a matte contour or a cooler bronzer at the outer temples and along the far jaw edge. Start with a narrow brush or a small amount on a sponge so the first pass stays reversible. A useful makeup for round face to look slim test is to keep the shadow close to the perimeter, leave the center of the cheek open, and blend until the edge is a change in depth rather than a visible stripe.
Do not draw a dark line through the hollow of the cheek and stop there. Begin near the upper ear, angle the product slightly upward under the cheekbone, and fade before the color reaches the center of the face. Continue a light trace at the jaw only if it follows your actual bone; a low or heavy jaw mark can make the lower face look shorter.
For simple makeup for round face, skip a full contour map. Use one soft shadow at the temples, a small amount under the outer cheekbone, and a clean blend around the jaw. If the result looks muddy, the fix is usually less product or a cooler, more transparent layer, not a darker stripe.
For a frame comparison after the placement test, use the round-face frame guide.
Move blush higher before making it brighter
Blush changes the apparent width of the face because it creates a visible color boundary. Place the first tap above the fullest part of the apple, then sweep or stipple outward toward the outer corner of the eye. Stop before the color travels past the eye line or forms a horizontal band across the cheek.
Try one cheek with the color centered low and the other with the color higher and slightly outward. Keep the amount and brush the same. Look straight ahead, smile, and turn three-quarters. The higher side should keep more air below the cheek and make the cheekbone route easier to see. If it looks pulled too far toward the temple, soften the outer edge instead of dragging the whole placement downward.
The same round face makeup placement check works for cream and powder: place first, diffuse second, then wait a few minutes for the formula to settle. A damp sponge can soften a cream edge; a clean fluffy brush can remove excess powder without moving the base underneath.
Use the center line as a quiet guide
Highlight is not only shimmer. A lighter base or a soft satin finish can guide attention to the bridge of the nose, the center of the forehead, the inner under-eye, and the top plane of the cheekbone. Keep the highlight narrow enough that it does not make the whole cheek read wider.
If the face feels flat after contour, add light in one place at a time. First check the under-eye and bridge, then the high cheekbone. Add the center of the forehead only when it does not compete with the brow shape. Skip the chin when it closes the lower face or makes the smile area look crowded.
For makeup for round face asian looks, makeup for round face indian looks, or any other complexion and feature combination, the same placement gates apply. Adjust undertone, opacity, and contrast to the skin and the lighting; do not treat an ethnicity label as a different face-shape rule.
Let the eyes create a longer route
Eye makeup can supply direction without adding more product to the cheeks. Use a softly extended outer line, a lifted outer shadow, or lashes that become slightly longer toward the outside. Keep the darkest point close to the lash line so the eye remains defined rather than surrounded by a wide block of pigment.
When testing eye makeup for round face, compare the eye with the cheek placement rather than judging it alone. If the cheek color already travels outward, keep the liner shorter and cleaner. If the cheeks are soft and centered, a small outward flick can supply the missing direction.
For makeup for round face and hooded eyes, keep the line visible with the eye open, then soften the wing so it does not become a thick fold of color. A lifted outer shadow can be more repeatable than a long liquid wing. Check the expression at rest and while smiling; the best angle is the one that stays readable when the lid moves.
Compare one side in real light
Makeup for round face and hairstyle choices often change the same visual frame. Hair at the cheek, a side part, or a high ponytail can alter the apparent width before the makeup is even added. Test the face and the hair together rather than copying a makeup placement from a bare-face reference.
Use a half-face comparison:
- Apply the edge shadow, higher blush, center light, and eye direction to one side only.
- Stand in indirect daylight, then check a warm indoor light without changing the camera angle.
- Smile, speak, and turn three-quarters so the color is judged on a moving face.
- Take away the first thing that looks heavy before adding more brightness.
- Copy the map only after the placement still feels balanced from the front and the side.
When hair changes the cheek frame, compare the round-face hair guide with the same light and movement checks.
Repair the first failed variable
If the face looks wider, inspect the blush edge and the amount of light on the cheek before darkening the contour. If the face looks muddy, reduce product and check undertone. If the lower face looks shorter, lift the jaw blend and remove any heavy mark at the chin. If the eyes look pulled down, shorten the wing or raise the outer shadow while the eye is open.
This repair order keeps makeup for round face to look slim from turning into a more complicated stack of products. Change one zone at a time, photograph the same expression, and keep notes about the brush, formula, and light. A result that works only in a still selfie is not finished.
Round-face makeup questions
What makeup looks best on a round face?
The most useful starting look is a soft perimeter shadow, higher outward blush, a controlled center highlight, and eye definition that adds direction. The exact color and finish should follow your skin, texture, and the light where you will wear it.
Should blush go on the apples of a round face?
It can, but keep the strongest color slightly higher and let the outer edge travel toward the eye rather than across the center of the cheek. Test a small amount first and check the face while smiling.
How can I make a round face look more defined without heavy contour?
Use a light shadow at the temples and jaw edge, keep blush high, and place a narrow highlight on the center line. Eye direction and hair placement can add structure without adding more pigment to the cheek.
Do I need different makeup for a round face and hooded eyes?
Use the eye-open view as the test. Keep the darkest color close to the lashes, soften the outer flick, and judge the eye with the cheek placement so the whole face has one direction.
Is makeup for round face and hairstyle a separate decision?
No. Hair at the cheek, the part direction, and the amount of height above the forehead change the frame around the makeup. Test them together, but change one variable at a time.
Keep the placement you can repeat
Good makeup for round face does not erase the round pattern. It gives the edge, lift, center, and eyes separate jobs, then checks those jobs in real light and movement. Keep the map that still looks balanced after a smile, a turn, and a normal day of wear.
For a more neutral face-shape comparison, use the oval-face frame guide and keep the fit test separate from makeup placement.