
Choose makeup for an oval face by setting the blush route, perimeter contour, short highlight landmarks, and eye direction before checking the result in motion. Open the detector
makeup for oval face
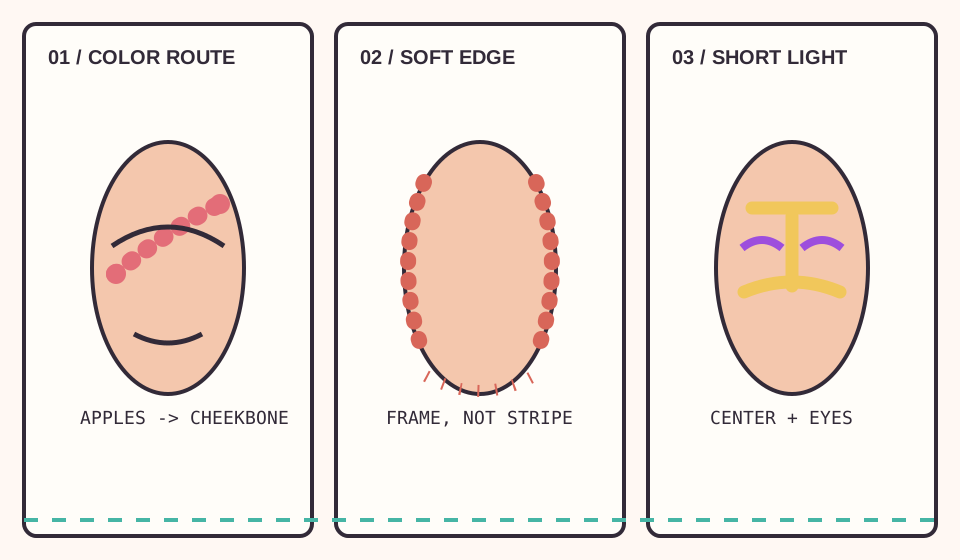
For makeup for oval face, start by preserving the balance that is already there: place blush from the apples toward the upper cheekbone, keep contour close to the perimeter, use short highlights on the center planes, and let the eye direction follow your features. The useful result is not a longer or narrower mask. It is a placement map that still looks balanced when you smile, turn, and change the light.
Protect the proportion before adding product
An oval outline often reads longer than it is wide, with the cheekbones carrying the broadest line and the forehead and jaw tapering without a hard corner. Use the detector and the face-shape reading guide as a starting reference, then check your own face in a level, front-facing view. Hair, expression, camera distance, and light can change the apparent outline more than a label suggests.
Before opening a palette, name the job for each zone. Blush can add width and color, contour can quiet a boundary, highlight can mark a plane, and eye makeup can choose the direction of attention. When every zone is asked to narrow or lengthen the face, the result usually becomes heavier instead of clearer.
Place color from the apples toward the cheekbone
Start with a small amount at the apples, then carry the outer edge upward and outward along the cheekbone. This gives the center a fresh point while keeping the strongest color from forming a low horizontal band. For oval face makeup placement, compare the front view with a three-quarter view before adding more pigment.
Try a half-face test. Keep the formula and amount the same, place one side low and centered, then place the other side slightly higher with a soft route toward the outer eye. Smile, relax, and turn. The side that still has space below the cheek and does not pull the face downward is the better starting map.
For oval face makeup blush, the apples are a useful anchor rather than a fixed finish. Move the outer edge based on the cheekbone you can actually see, and diffuse the boundary before it reaches the temple. Cream and powder can follow the same placement order; only the blending tool and the time needed to settle change.
Keep contour at the frame
Use a matte, softly transparent shade near the hairline, the outer cheek, or the jaw only when that zone needs more separation. A cooler or warmer undertone should follow the skin and the light, not a face-shape rule. Start with less than you think you need, then blend until the change reads as depth rather than a stripe.
Oval faces rarely need a full dark perimeter. A heavy vertical mark below the cheekbone can make the face appear longer, while a low jaw shadow can close the lower third. If the contour looks muddy, remove product and inspect the undertone before changing the face map.
For a frame check after the makeup map, compare the oval-face frame guide and keep the fit test separate from placement.
Use light as short landmarks
Highlight should identify planes, not cover them. Test a narrow touch on the bridge of the nose, the high cheekbone, the brow bone, and the center of the forehead. Add the chin only when it keeps the lower face open. A satin finish or a lighter base can do this work without a bright stripe.
Move one landmark at a time. If the cheek looks wider, reduce the light there before darkening the contour. If the forehead feels too long, keep the forehead highlight shorter and let the eye or blush supply the next point of attention. This repair order keeps the base intact while you find the useful contrast.
Let the eyes choose the route
Eye makeup can add direction without changing the cheek placement. A softly lifted outer shadow, a short wing, or lashes that extend toward the outside can guide the eye along the cheekbone. Keep the darkest value close to the lash line and check it with the eye open.
For makeup for oval face and almond eyes, start with the natural crease and extend only the outer route that remains visible when the eyes relax. For makeup for oval face hooded eyes, place the visible shape above the fold and soften the outer edge instead of drawing a thick line that disappears. In either case, compare the eye direction with the blush direction so they do not compete.
Check the map in motion and changing light
Makeup is not finished when it works in one still selfie. Use the same face, expression, and camera distance for a small repeatable audit:
- Take a straight-on view in indirect daylight before touching the second side.
- Smile, speak, and turn three-quarters to see whether blush or contour breaks into a stripe.
- Check a warm indoor light without changing the amount of product.
- Look down and back up to inspect the bridge, brow, and under-eye transition.
- Remove the first heavy zone, then repeat the comparison before adding brightness.
If the face looks longer, bring the eye and blush route slightly closer to the cheekbone instead of adding width at the lower cheek. If the face looks flat, add one quiet center landmark rather than rebuilding the whole perimeter. If the result works only after a precise pose, the placement still needs a simpler reset.
Make the routine follow your features
Natural makeup for oval face does not mean using fewer decisions. It means using transparent layers, a controlled edge, and a color route that can survive the light where you actually wear it. Skin texture, undertone, freckles, glasses, hair at the cheek, and eye shape all change the finish without changing the basic placement order.
Write down the products, brush, amount, and light that worked. On the next attempt, change one variable only: blush height, contour opacity, highlight width, or eye direction. A repeatable map is more useful than a dramatic first pass that cannot be rebuilt the next morning.
Questions before you choose the placement
Where should blush go on an oval face?
Start near the apples, then soften the color upward and outward along the cheekbone. Keep the strongest edge above the fullest point and check the result while smiling and turning.
Does an oval face need contour?
Not automatically. Use a light matte shadow only where you want more separation, usually near the hairline, outer cheek, or jaw. Stop when the outline reads clearly without a visible stripe.
How do I keep makeup from making an oval face look longer?
Avoid a low vertical contour and overly tall cheek highlight. Keep blush and eye direction connected to the cheekbone, and test the face in a neutral expression as well as a smile.
Is natural makeup for oval face a different technique?
It is the same placement order with lighter opacity and softer edges. Transparent layers make it easier to see which zone is creating width, length, or unwanted weight.
What changes for hooded or almond-shaped eyes?
Keep the eye-open view as the measurement. Let the visible outer route follow the eye's structure, then compare it with the blush direction so the two areas point the same way.
Keep the map that protects the oval balance: color from the apples, edge shadow only where needed, light on short planes, and eyes that add a direction you can repeat. The best makeup is the version that still reads naturally after a smile, a turn, and a change of light.