
Choose makeup for a heart shaped face by quieting the upper perimeter, carrying color toward the cheekbone, and keeping the lower center light and controlled. Open the detector
makeup for heart shaped face
For makeup for heart shaped face, start by quieting the upper perimeter and giving the cheekbone a controlled route: soften the temples and outer forehead, sweep blush from the apples toward the cheekbone, use small highlights on the center planes, and keep the lower center softly open. The goal is not to hide the widest line. It is to make the transition from a broader upper face to a narrower chin look intentional when you smile, turn, and change the light.
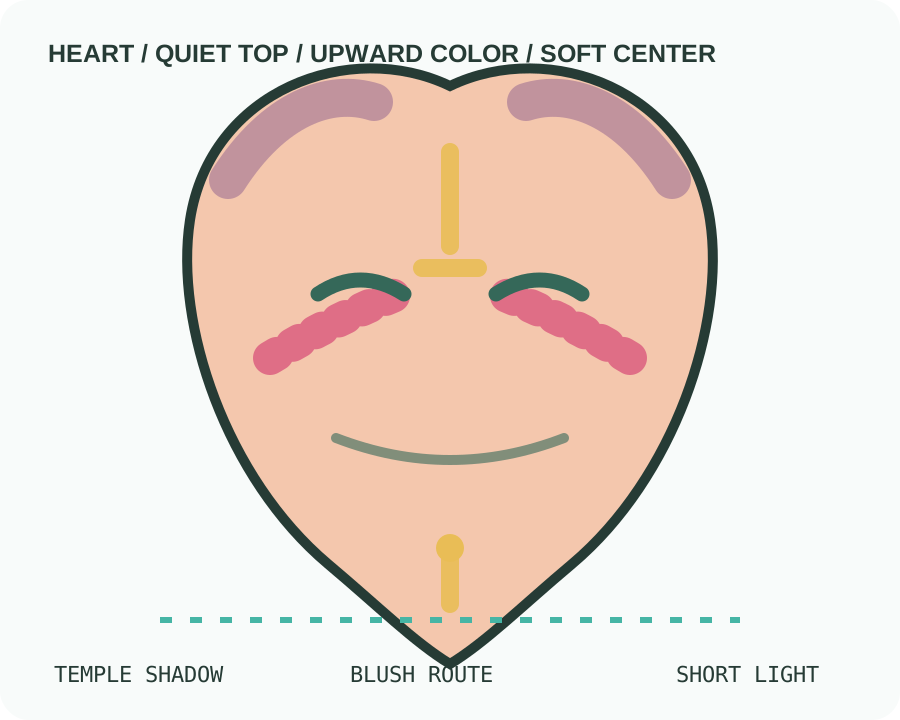
Read the upper and lower lines first
A heart-shaped outline often reads wider through the forehead and upper cheekbones, then narrows toward the jaw and chin. That pattern can be subtle, especially when hair, brows, expression, or a camera angle changes the frame. Use the detector and the face-shape reading guide as a starting reference, then confirm the visible width in a level front view and a relaxed three-quarter view.
Before adding product, mark three jobs: reduce visual pull at the temples, connect color to the cheekbone, and keep the chin from becoming the only bright or dark point. This map is more useful than treating every heart-shaped face as the same width or the same undertone.
Keep the upper perimeter quiet
For simple makeup for heart shaped face, begin with a thin, diffused shadow at the outer forehead and temples only where the upper line feels visually strong. Stop before the shadow turns into a frame around the whole face. A soft matte texture usually gives more control than a dense stripe, and the correct depth is the one that disappears when you step back from the mirror.
Use the same amount on both sides only as a first test. Hair parting, side light, and brow height may make one temple read heavier. Compare left and right in indirect daylight, then blend the stronger side instead of adding more to the lighter side.
Carry blush up, not out
Place a small amount near the apples, then sweep the color up along the cheekbone toward the outer eye. This route gives the middle of the face a clear point while avoiding a low band that can make the upper width feel heavier. Keep the outer edge soft before it reaches the temple; the cheekbone is the destination, not a reason to extend color to the hairline.
For natural makeup for heart shaped face, use transparent layers and pause between passes. A smile can lift the apples enough to make the first placement look higher than it really is, so check both a neutral expression and a smile. If the face seems top-heavy, lower the opacity at the outer forehead before moving the blush farther outward.
Shape the lower center with restraint
The narrower jaw and chin do not need a dark outline. If the chin looks too pointed in a particular light, place a small amount of soft shadow beneath or just beside it, then fade the edge into the jaw. Do not draw a hard V or carry the shadow around the entire lower perimeter; that can make the lower face look smaller while making the upper width more obvious.
For heart shaped face contour, think in short repairs: temple softness first, cheek color second, lower-center correction last. Change one zone at a time and inspect the whole face after each blend. The useful result leaves the chin readable without making it the visual finish line.
Use short highlights on stable planes
Keep light points compact on the upper cheekbone, the bridge of the nose, and the center of the chin only when each point helps the face read as one connected plane. A broad forehead highlight can pull attention toward the widest zone, while a long chin highlight can exaggerate the taper. Use a satin or skin-like finish and check the result from a normal conversation distance.
For easy makeup for heart shaped face, tap on the smallest amount first, then turn your head toward and away from the light. If the cheekbone disappears in one direction, adjust the highlight width before increasing brightness. Makeup should keep working when the light moves, not only when the face is held square to the mirror.
Let the eye shape add direction
Eye makeup can guide attention without adding more width to the temples. Keep the darkest value near the lash line, then angle the outer route slightly up or outward according to the eye's own fold. Avoid a broad horizontal block that repeats the forehead width. For eye makeup for heart-shaped face, compare the open-eye view with the relaxed view so the visible shape does not vanish into the crease.
If the outer corner already points upward, use a shorter wing and let the lashes do the work. If the eye is hooded, keep the visible color above the fold and soften its outer end. The route should support the cheekbone sweep rather than compete with it.
Test the map in four views
Use a repeatable check before adding more color:
- Take a straight-on photo in indirect daylight with a neutral expression.
- Smile, speak, and relax so the blush does not get judged only on lifted cheeks.
- Turn three-quarters and look down to inspect the temple shadow, cheek edge, and chin highlight.
- Repeat under warm indoor light without changing the product amount.
This makes best makeup for heart shaped face a fit question rather than a product ranking. If the upper face still dominates, soften the outer forehead and shorten the highlight before darkening the chin. If the lower face disappears, remove excess shadow first and keep a small center light instead of widening every bright area.
Adapt the routine without changing the map
For makeup for heart shaped face over 50, begin with thinner layers, a softer perimeter, and a finish that does not collect at expression lines. Mature skin, texture, glasses, brows, and hair can change how a line reads, but the placement order still gives you a useful starting point. For a quicker routine, makeup for heart shaped face images can help you compare direction, but use your own light and expression for the final decision.
Record the product, brush, amount, and light that made the upper edge feel quieter. On the next attempt, change one variable only: temple opacity, blush height, chin shadow, highlight width, or eye direction. A repeatable map is more valuable than a dramatic first pass that cannot be rebuilt.
For a rounder cheek outline, compare the round-face makeup guide and keep the placement audit separate from the label.
For a more even perimeter, compare the oval-face makeup guide after checking the same light and movement conditions.
When the hairline changes the upper frame, compare the heart-shaped face haircut guide before adding more contour.
Questions before you finish
Where should blush go on a heart-shaped face?
Start near the apples and soften the color upward along the cheekbone. Keep the strongest edge away from the temple and check the route in a neutral expression as well as a smile.
Should I contour a heart-shaped face?
Only where the upper perimeter or lower center needs a small correction. Use a diffused temple shadow and, if needed, a very light chin adjustment. Stop before either becomes a visible stripe or hard V.
What is a good eye direction for this face shape?
Keep the darkest value close to the lash line and use a short lifted outer route that follows the eye's own fold. Avoid a broad block that repeats the forehead width.
How can I keep the chin from looking too pointed?
Avoid a bright, long highlight and a hard V-shaped contour. Use a small soft shadow only where the light makes the point dominate, then inspect the whole lower third.
Does a softer heart-face routine require different products?
No. It usually means lighter opacity, softer edges, and fewer landmarks. The same placement order can be rebuilt with the products and finish that suit your skin.
Keep the upper edge quiet, route blush toward the cheekbone, use short light points, and let the eye direction follow the face instead of widening it. The best result is the map that still looks balanced after a smile, a turn, and a change of light.