
Map blush placement with a repeatable START, TURN, and STOP route, then adjust the three points for the face line you can see. Open the detector
blush placement
For blush placement, treat the brush path as a route with three decisions: where color starts, which direction it travels, and where it stops. Begin near the upper cheek, turn according to the face line you want to emphasize, and stop before the color reaches the temple or jaw edge. That order makes face shape blush placement easier to repeat than memorizing a different trick for every label.
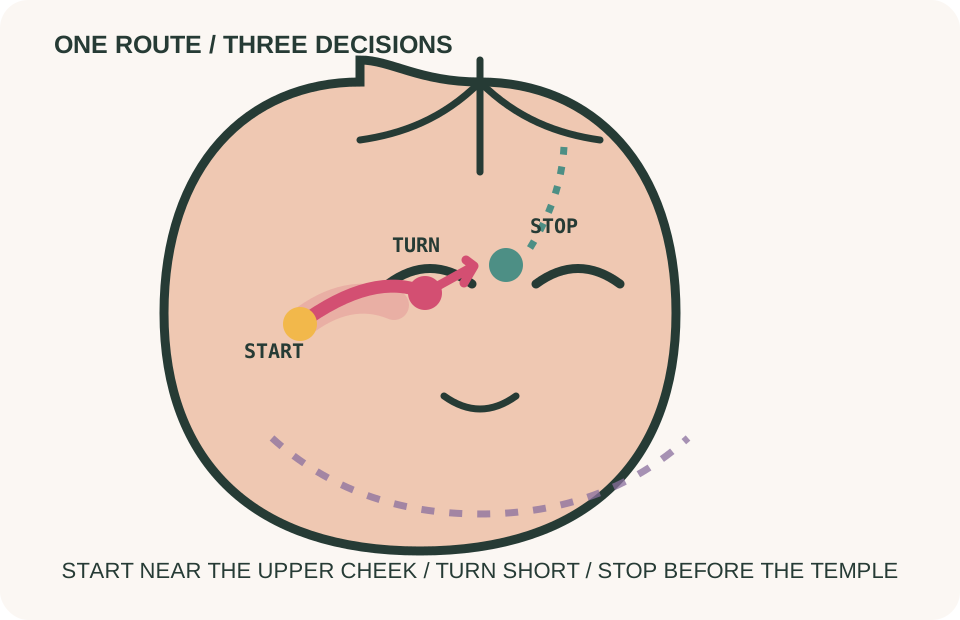
Use the START / TURN / STOP route
The useful part of a blush map is not a fixed dot on the cheek. It is the relationship between three points.
- START: place the first tap where you can still see the color with the face relaxed. The upper cheek is a practical beginning for most routes because the cheek moves during a smile.
- TURN: choose a short direction instead of blending in a circle. A diagonal or horizontal turn gives the face a readable line and keeps the color from gathering into a patch.
- STOP: release pressure before the outer cheek, temple, or jaw corner. The last third of the brush should carry leftover color, not add a new center of pigment.
Use a light hand and build in two passes. A route that looks balanced at the first tap is easier to repair than one that has already reached the perimeter. Check it in daylight and again near a window that changes the shadow under the cheekbone.
Keep a one-variable route ledger
Blush becomes inconsistent when formula, brush, amount, and placement all change at once. Keep a short ledger in the notes app on your phone:
- Anchor: upper cheek, apple, or below the cheekbone.
- Turn: upward diagonal, horizontal, or soft circular blend.
- Stop: before the temple, under the outer brow, or before the jaw edge.
- Pressure: sheer single pass, two taps, or one tap plus a clean brush.
Change only one line between tests. If the color looks too high, lower the anchor before changing the turn. If it looks too wide, move the stop inward before choosing a darker shade. If one side disappears in photographs, compare the amount and pressure on each side rather than assuming the face is asymmetric.
This ledger also separates placement from preference. You may want a visible editorial line, a softer wash, or almost no color. The route can stay the same while the amount changes.
Match the turn to the visible width
Round face
For blush placement for round face, start on the upper cheek and turn a short diagonal toward the outer brow. Keep the strongest color near the center of that route and stop before the temple. The line can make the cheek feel more directed, but it does not physically change the face and should not be sold as a guaranteed slimming result.
If the search is blush placement for round face to look slimmer, use the same high diagonal with less width. A narrow route and a clean stop are more useful than a dark stripe under the cheekbone. Keep the perimeter quiet so the blush does not repeat the fullest cheek line.
Square face
For blush placement for square face, start close to the apple and make the turn short and upward. Stop well before the outer cheek corner. The goal is to keep color away from the jaw's horizontal line and give the middle of the face a softer direction. If the cheek already has a strong angle, use a rounder brush movement at the start and keep the outer end light.
Oval face
For blush placement for oval face, begin on the upper cheek and follow the natural cheekbone with a restrained upward turn. Oval faces often need less correction than other patterns, so the route should look intentional without competing with the eyes or lip. Stop below the outer brow and leave the edge soft.
Heart-shaped face
For blush placement for heart shaped face, start slightly below the outer half of the eye and turn sideways across the cheek before lifting at the end. Keep the upper perimeter quiet and stop before the temple. This gives the middle third of the face a little more presence without making the forehead and cheekbones look wider.
Diamond face shape
For blush placement for diamond face shape, begin just below the cheekbone peak instead of placing the strongest color directly on it. Turn softly toward the center of the cheek, then stop before the widest point. The route should frame the peak rather than draw a second bright edge around it.
Long face
For blush placement for long face, start with a wider horizontal footprint across the middle of the cheek. Turn outward rather than sharply upward, and stop before the temple. A sideways route adds a crosswise visual line; a long vertical route can make the middle third feel even more stretched.
Inverted triangle face
For blush placement for inverted triangle face, use the same quiet upper perimeter as a heart-shaped route. Start on the middle cheek, turn laterally, and stop before the outer corner. Keep the strongest color below the widest upper line so the lower face does not disappear.
Adjust for the cheek you can see
For blush placement for high cheekbones, place the first tap below the most prominent point. A high cheekbone is a landmark, not a shelf that needs another stripe on top of it. Let the brush move around the peak and keep the edge diffuse.
The lookup blush placement for round face asian does not need a separate technique based on ethnicity. Use the visible face proportions, cheek fullness, skin undertone, and makeup finish in front of you. The START / TURN / STOP route is a placement framework, not a claim that one ethnic group has one face shape.
On mature or textured skin, a sheer cream or liquid can make the route easier to control than a dry powder brush. Tap the product on with a fingertip or soft brush, then use a clean brush to move only the outer edge. Avoid dragging the center of the color back and forth; repeated friction can make texture more visible.
Read movement before adding more color
Blush placement should survive the face in motion. Check four conditions in the same light:
- Neutral face: the start point should be visible but not look stamped on.
- Smile: the apples move upward. The color should stay in the same general zone rather than sliding onto the lower cheek.
- Three-quarter turn: the stop point should not jump into the temple or merge with contour.
- Glasses: if frames cross the route, keep the strongest color away from the nose pads and lower rim.
If the route fails one check, repair that point first. Move the start down when color sits too close to the eye. Shorten the turn when it spreads too wide. Soften the stop when the edge looks like a stripe. Change the shade only after the geometry works.
Protect the center of the face
Blush placement is only one part of the color map. A soft bridge of light, defined brows, or a controlled lip can change how the same cheek route reads. Keep one area quiet: if the blush is the strongest color, let the eyes or lips support it rather than compete.
For a round-face makeup comparison, use the round-face makeup guide and keep the higher cheek route. If the outer face corners are the main feature, the square-face makeup guide shows where to shorten the turn. A longer face can use the long-face makeup guide for a sideways color direction. These are comparison points, not reasons to copy every step onto this page.
Decide when the route is finished
A finished blush route has no hard beginning, no obvious outer bracket, and no muddy transition into contour. Step back at arm's length, turn off magnification, and look at the face before zooming back in. If the color is visible only as a spot at close range, it is probably narrow enough; if it appears as a band from across the room, reduce the amount before moving the whole route.
Take one photo with the phone held at eye level and another with the face turned slightly toward the light. Compare the two images for placement rather than complexion. A route that stays readable in both is more reliable than a close-up that looks perfect only from one angle.
Frequently asked questions
Where should blush be placed first on any face shape?
Place the first tap on the upper cheek or slightly below the cheekbone, depending on where the face looks fullest. Start closer to the center than the intended finish, then carry the color outward without adding a hard end point.
Does blush placement for a square face need to avoid the whole cheekbone?
No. Keep the strongest color on the middle cheek and make the upward turn short. The outer cheek can still carry a soft trace, but it should not form a sharp bracket beside the jaw.
Can blush placement change a round face into another shape?
It can change where the eye travels and how the cheek is emphasized. It cannot change bone structure or guarantee a different face-shape classification. Use the route as a styling choice, then reassess with the face relaxed.
How much blush should be used for a soft result?
Start with one light pass and add a second only after checking the route in daylight. Two sheer layers usually give more control than one heavy layer because the stop point remains movable.
What is the easiest blush placement for a beginner?
Use the upper-cheek START, a short diagonal TURN, and a STOP before the temple. Keep the brush pressure light and compare the finished route at arm's length. Once that is repeatable, adjust the anchor or turn for your visible face proportions.
The best blush placement is the route you can rebuild without guessing. Begin with a clear start, send the color in one direction, stop before the perimeter, and keep the version that remains balanced after a smile and a turn toward the light.