
Choose makeup for a long face by opening the vertical contour stops, carrying blush sideways, and keeping the brow and eye cues related. Open the detector
makeup for long face
For makeup for long face, think in horizontal stops instead of one long vertical correction. Keep contour off the center of the forehead and chin, place cheek color across a level band that ends before the temple, and use the eyes, brows, and lips to create repeated width cues. A long or rectangular outline does not need to be disguised; it needs a repeatable map that still looks balanced when you smile and turn.
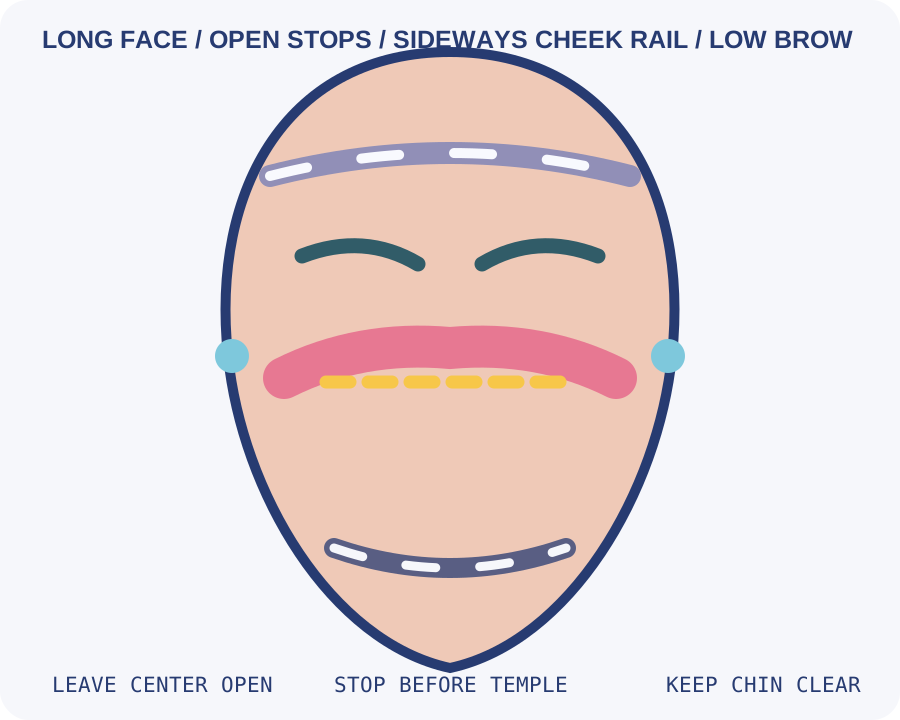
Set a level baseline before choosing makeup
Use the [face-shape reading guide](/what-is-my-face-shape) once, then leave the labels aside for the application pass. Sit facing a window with the camera or mirror at eye level. Pull the hair back, keep the head straight, and take one front image plus one three-quarter image on each side. The three-quarter views matter because a long face can look wider in a selfie and narrower in a mirror without either view being wrong.
Mark three stops on the front image: the hairline, the point where the lower eyelid meets the cheek, and the lower edge of the chin. Do not measure a goal face. The purpose is to see where color already creates strong vertical movement. A bright center stripe, a dark line down the side of the nose, and a sharply lifted outer brow can all compete for the same vertical job.
Choose one axis to widen
The most useful long-face decision is not "how much contour" but "where should the viewer pause." Choose one primary axis for the first attempt:
- Cheek axis: carry blush and a short highlight along the cheekbone rather than toward the temple.
- Eye axis: extend the midtone slightly beyond the iris, then keep the darkest shadow near the lashes.
- Brow axis: build a low, softly horizontal brow with a gentle tail instead of repeating a high arch.
- Lip axis: widen the visible center of the mouth with a soft edge while keeping the corners unforced.
Add a second axis only after checking the front and both three-quarter views. Four strong horizontal cues can make the face look segmented even when each placement is technically correct. Two related cues usually read as one intentional direction.
Apply contour as a frame with open sections
Begin with an even base. If contour is useful, place it at the top hairline, the outer temple, and the underside of the chin, but leave a visible gap through the center of the forehead and the front of the chin. The gap is the stop point. It keeps the contour from becoming a continuous border around a vertical shape.
At the cheek, use a short shadow beneath the cheekbone and blend it toward the ear. Avoid pulling the shadow down toward the jaw; that repeated diagonal adds length and can make the lower face look heavier. The same principle applies when comparing makeup for oblong face: treat oblong and long as closely related planning terms while using the actual front view to decide whether the jaw is rounded or angular.
Make blush travel sideways, not upward
Tap blush near the outer half of the apple, then sweep it almost level toward the ear and stop before the temple. Keep the lower edge soft so the color does not form a second cheekbone line. If the face is narrow through the middle, use a slightly wider brush and less pressure; a small brush can turn a horizontal route into a concentrated dot.
The upper cheek can carry a restrained highlight that overlaps the blush rather than sitting above it. Keep that light short and horizontal. A long highlight from the inner cheek to the temple will restore the vertical stretch the placement was meant to interrupt.
Build the eye without pulling it outward
Use an eye shadow map with a soft center and a controlled outer edge. Place the deepest value close to the upper lashes, blend a midtone slightly past the outer iris, and keep the area beside the temple quiet. A short flick or soft wing can finish the line, but a long upward wing adds another vertical route. Mascara should open the center of the eye first; layering thickness only at the outer corners can make the face look more stretched.
Hooded or mature lids need a different stop point, not a different rule. Apply the visible color with the eyes open and check that it has not disappeared into the fold. Keep shimmer away from the deepest crease if it emphasizes texture. The eye does not need to look wide in every direction; it needs to stay connected to the cheek and brow route.
Use a low brow echo
Brows can provide the clearest horizontal cue. Keep the front soft, locate the highest point near the natural change in the brow bone, and finish the tail no farther than the outer eye corner. A high peak plus a long tail creates two vertical signals and can make the upper face look more elongated.
Grow-in or sparse brows can be strengthened through the center and lower edge before the upper arch is darkened. This is an important long-face adjustment: build the horizontal base first, then add definition where the brow already supports it. Set the [face shape chart](/face-shape-chart) aside while applying; it is useful for orientation, not a live guide for every brush stroke.
Give the lips width without a hard outline
Choose a lip shape that keeps the center visible and the corners natural. A soft liner that follows the lip can stop slightly before the corners, while a small amount of color through the center can add width without creating a flat line. Keep gloss concentrated in the middle if the lower face already looks long; a full high-shine strip from corner to corner can move attention straight down.
A makeup for triangle face plan would instead quiet the jaw and build more width at the forehead, so do not borrow it unless the lower face is clearly the wider end. The long-face page is not a universal makeup rule. It is a placement sequence for a vertical outline that needs a few well-chosen horizontal cues.
Repair the frame with hair and glasses
Hair changes the apparent face length before makeup does. A curtain edge that lands above the cheek can echo a narrow center, while a side route that opens at the cheek creates a useful width pause. Compare hair tucked back and hair in the intended style before darkening the temple. The [oblong hairstyle guide](/oblong-face-hairstyles) can help test width and front movement without changing the makeup map.
Glasses add their own horizontal line. Put the frames on before adjusting blush or temple contour. If the lower rim lands on strong cheek color, soften one of them. If the bridge is short and the lenses sit close to the cheeks, move the strongest blush farther back rather than brightening the under-eye area. Frame fit belongs to a separate test; this page only asks whether the makeup still works around the line the glasses create.
Run the movement check before adding more
Check the face at rest, while speaking, while smiling, and with the chin lowered slightly. Then turn about one-third to each side. The blush should still travel across the cheek, the brow should not become a sharp diagonal, and no contour should form a visible bracket around the chin.
Photograph the front view again with the same crop and light. Compare the first and final images at normal size, not zoomed into each feature. If the face looks longer after the application, remove the highest highlight or shorten the outer brow before removing all the blush. If it looks wider but disconnected, soften the outer end of the cheek color and restore a small center light.
Keep a one-change reset ledger
After each attempt, record four variables: blush direction, outer blush stop, brow peak, and chin-contour stop. Change only one variable next time. This turns makeup for long face into a repeatable placement experiment instead of a new routine every morning.
Keep a clean brush nearby for repair. A blurred edge is usually more useful than another layer of product. If the look photographs well but feels severe in conversation, reduce the contrast between contour and skin before changing the lip or eye. If it feels flat in person but strong in photos, lower the camera flash and check again under indirect light.
Match the finish to the lighting
Matte contour can look like a drawn line under overhead light, while a reflective highlight can flatten the center of the face in flash photography. Use a soft matte edge for the contour, a low-shine cheek color, and a controlled highlight that follows the cheekbone. The finish should reveal the horizontal route without making every landmark equally bright.
On textured or mature skin, press color into the skin with a small brush and build slowly. Cream products can move with expression; powder can set a cleaner edge. Neither is automatically better. Test the chosen finish while talking and smiling, because movement is where an over-extended cheek or brow placement becomes obvious.
Long-face placement questions
Where should blush go for a long face?
Start near the outer half of the apple and blend almost horizontally toward the ear. Stop before the temple, and keep the strongest color from becoming a narrow vertical stripe.
Should contour cover the forehead and chin?
Use short shadow placements at the top hairline and under the chin, with wide open gaps through the center of both areas. A continuous border makes the face look more framed rather than more balanced.
What eyebrow shape works with long-face makeup?
Choose a low, softly horizontal brow with a gentle peak and a tail that ends near the outer eye corner. A pronounced arch and a long tail add too much vertical emphasis.
How can I tell whether the placement worked?
Compare the front view, both three-quarter views, and a speaking expression under the same light. Keep the map only when the cheek, eye, and brow read as related horizontal cues without becoming separate stripes.
Use the [oval-face makeup guide](/makeup-for-oval-face) when the outline already looks balanced, the [square-face makeup guide](/makeup-for-square-face) when the corners dominate, or the [diamond-face makeup guide](/diamond-face-shape-makeup) when the cheekbone peak is the strongest width. For the first pass, keep the map simple: one widened cheek or eye route, one restrained brow echo, and a clear stop on every vertical line.