
Choose diamond face shape makeup by mapping the cheekbone peak, keeping contour below it, and carrying compact light through the forehead and chin. Open the detector
diamond face shape makeup
For diamond face shape makeup, map the cheekbone peak, the narrower forehead, and the narrower chin before you add contour. Keep the deepest color under the cheekbone instead of across it, place blush on the cheek rather than sweeping it toward the ear, and use small light points at the forehead center and chin to make the upper and lower planes read with the middle. This order keeps the cheekbones as a feature, not a hard horizontal boundary.
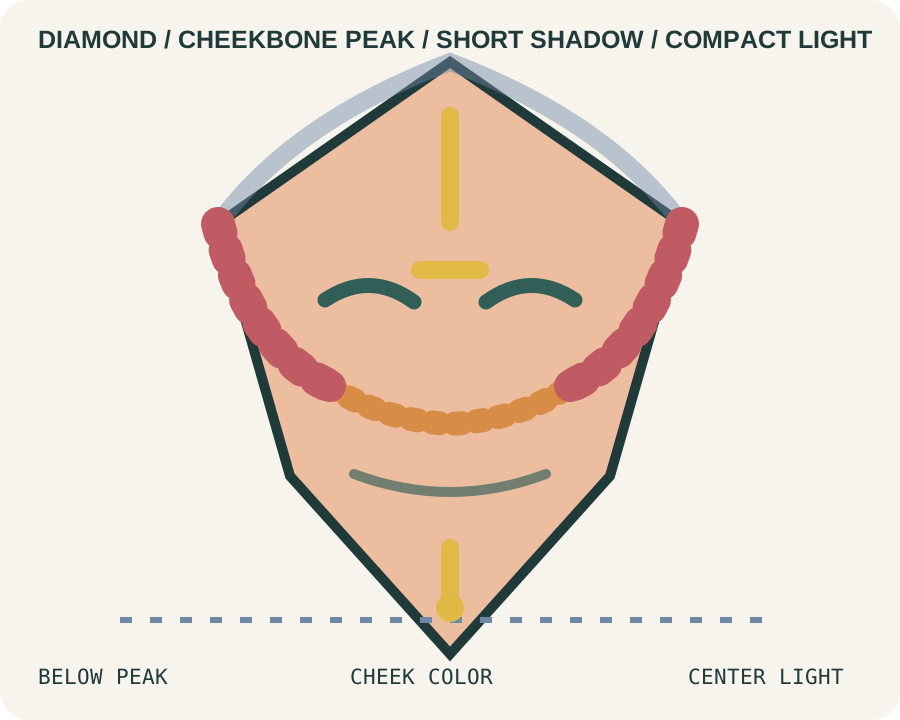
Read three lines before choosing a contour
Start with a clean, level front view and mark three lines with your eyes: the widest point at the cheekbones, the width across the forehead, and the width near the chin. A diamond pattern is not defined by a pointed chin alone. The useful clue is that the middle third carries most of the visible width while both outer thirds narrow.
Use the face-shape reading guide to compare the three widths before calling the pattern diamond.
That map changes the usual contour instruction. A broad stripe placed directly on the cheekbone makes the widest line more obvious. A short shadow placed just below the peak, blended toward the ear, lets the cheekbone stay visible while the transition below it becomes softer. Stop the color before it reaches the mouth; otherwise the center of the face looks hollow from the front and even more sculpted from the side.
Decide which correction the face actually needs
Do not use every technique just because the face is classified as diamond. Choose one main issue for the first pass:
- Width at the cheekbones: use a thin, diffused shadow below the peak and leave the top of the cheekbone clean.
- A narrow forehead: add a small amount of light through the center of the forehead, not across the whole hairline.
- A narrow chin: use a compact center light and keep dark contour away from the point unless a specific angle needs repair.
- Both outer thirds look narrow: reduce the intensity of the cheek contour before adding more brightness above and below.
This makes diamond face shape makeup placement a decision process rather than a fixed count of stripes. Compare the three areas at normal conversation distance, then choose the smallest adjustment that changes the balance.
Build the application sequence in thin layers
Use a repeatable order so the finished look can be corrected without removing everything:
- Apply foundation or tint evenly; allow the perimeter to remain slightly less heavy than the center.
- Place a small amount of contour below each cheekbone peak. Blend down and back, never forward into the cheek.
- Add a restrained line at the temples only if the upper width looks abrupt. Keep it shorter than the brow.
- Place blush on the cheek and blend inward or along the cheek, depending on the look you want.
- Add compact highlight at the center forehead, bridge, and chin only where the face needs continuity.
- Finish the eyes and lips after checking the face from two steps away.
The diamond face shape makeup guide is easiest to use when each step has a stop point. A contour that can still be seen as a distinct shape is usually too strong. Build thin layers and keep the transitions wider than the colored line.
Keep blush on the cheek instead of launching it outward
The common mistake is to pull blush from the apple straight toward the ear. That repeats the widest horizontal line and can make the cheekbone feel sharper than it is. Place the first tap near the apple, then blend it slightly upward or inward while keeping the strongest color off the outer edge of the cheek.
For a soft everyday makeup for diamond face look, choose a color close to the natural flush and stamp it in place before blending. A dense brush can turn one small placement into a broad stripe. Use a lighter hand, check the color in daylight, and shorten the outer end if the cheek starts to dominate the eyes.
Use eyes and brows to balance the upper and middle face
The eye area can draw attention vertically without making the cheekbones louder. Keep the deepest shadow close to the lash line, then soften the outer edge so it does not form a blunt point beside the temple. A short lift at the outer corner can echo the diamond shape; a longer, heavier wing can exaggerate the same angle.
Brows work the same way. Keep the front light, place the peak where it follows the natural brow, and avoid a tail that extends far beyond the eye. For a more polished diamond face shape makeup tutorial, compare the eye and brow route before adding contour. If both the eye and cheek point outward, the whole middle face can look tense.
Adjust the map for glasses, hair, and mature skin
Glasses already add a horizontal line across the cheekbone area. If you wear them, apply the cheek shadow after the frames are on so you can see where the lower rim lands. A strong contour directly under a visible rim creates a double line; soften one of them and keep the blush slightly forward.
When frames enter the look, compare the diamond-face glasses guide so the lower rim and contour do not compete.
Hair can do part of the width management too. Side pieces that end at the cheekbone repeat the widest point, while a softer face-framing route can carry movement through the middle third. Before adding more makeup, compare the same face with hair tucked back and with the intended style.
For a hairstyle that changes the same cheekbone line, use the diamond-face hairstyle guide before adding another contour step.
On mature or textured skin, use a smaller amount of contour and a softer finish. Powder can catch on a dry patch and make the line look sharper; cream can move with expression but may need a lighter touch. The goal is a readable transition, not a perfectly even block of color.
Troubleshoot the finished look
Check the face under a window, a warm indoor light, and a direct front view. If the cheekbones look harder after contouring, remove product from the top of the peak first. If the forehead or chin seems to disappear, add light in a smaller point rather than brightening the entire area. If blush looks too wide, shorten the outer edge before changing its color.
For a diamond face shape makeup look that lasts through a normal day, carry a clean brush or sponge rather than more contour. Blending an edge after it settles is often enough. Photographs can help, but use one straight-on image and one three-quarter view; a single tilted selfie can make any face look more angular.
What to change next time
Record four details after each attempt: the contour shade, the brush size, the distance from the cheekbone peak, and the direction of the blush. Change only one variable on the next try. If the first map felt too carved, reduce the contour opacity or move it farther below the peak. If it felt flat, increase the forehead and chin light before darkening the cheeks.
Quick answers
Where should contour go for diamond face shape makeup?
Place a small amount just below the cheekbone peak, blend it toward the ear, and keep the top of the cheekbone clean. Add temple or chin contour only when a specific angle needs it.
Is blush placed differently on a diamond face?
Yes. Keep the strongest color on the cheek and avoid dragging it outward toward the ear. A short upward or inward blend softens the transition without repeating the full cheekbone width.
What is the best makeup for diamond face application order?
Start with even base coverage, add the cheek transition, place blush, use compact light points, and finish the eyes and lips after checking the whole face at conversation distance.
Should diamond face shape makeup add width to the forehead?
Only if the upper third looks narrow in the same front view. Use a small center light first; a wide bright band can create a new horizontal edge.
Use the cheekbone as the anchor, keep the contour below its peak, and make the forehead and chin part of one connected map. The best result is the one you can repeat after a smile, a turn, and a change of light.
For a rounder middle third, compare the round-face makeup guide while keeping the same light and movement checks.
For stronger outer corners rather than a cheekbone peak, use the square-face makeup guide to change the perimeter map.