
Map round-face contour as an outer shadow corridor, then test the ear anchor, cheek release, and short jaw hinge in motion. Open the detector
contour for round face
For contour for round face makeup, keep the strongest shadow at the outer edge and leave the middle of the cheek open. Start under the cheekbone near the top of the ear, release the brush before it reaches the front of the face, then use only a short trace along the back of the jaw. Finish by checking the temples and the center line in daylight. This ear-to-cheek-release routine adds direction without drawing a dark stripe through the fullest part of the cheek.
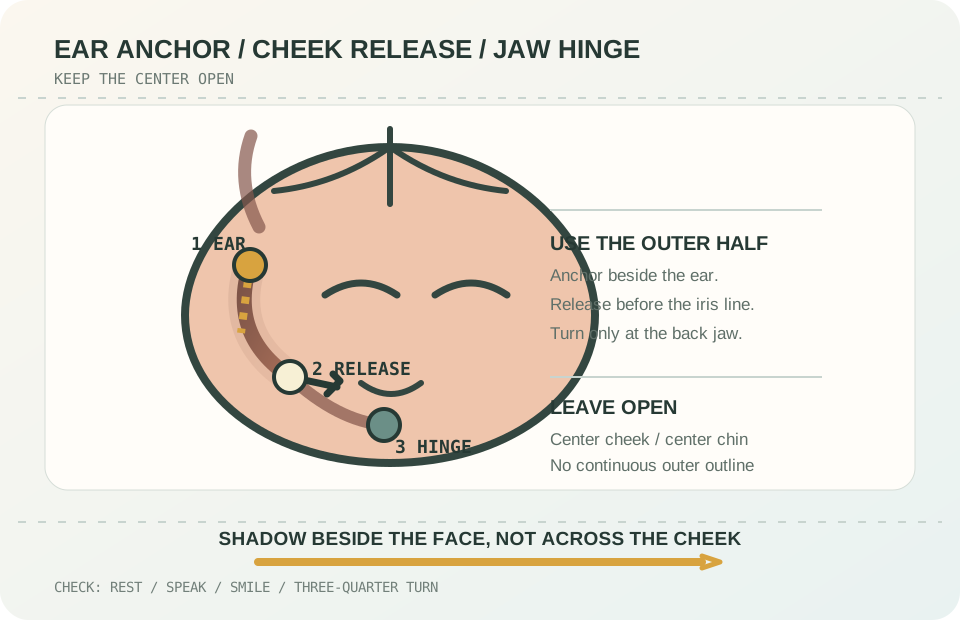
Build a shadow corridor
Think of round-face contour as a corridor beside the face, not a line across it. The corridor has an outer wall at the ear and temple, a soft inner edge below the cheekbone, and a lower turn toward the jaw hinge. Leave the center of the cheek, the center of the forehead, and the front of the chin outside that corridor.
This distinction matters because a round pattern can have soft cheekbones and a rounded jaw rather than one flat plane. The shadow should follow the depth you can actually see. When the contour stops too far forward, it can create a second cheek line; when it continues under the whole jaw, it can make the lower face look shorter. Keep the product where the face turns away from the light.
Set the ear anchor first
Begin with a small mark below the outer corner of the eye, following the natural hollow toward the top of the ear. Do not start at the mouth and drag backward. The ear anchor keeps the placement on the outer half of the cheek and makes the two sides easier to compare.
Use a small brush, sponge edge, or fingertip to press the first layer into place. Begin with less product than you expect to need. A neutral or cool-leaning matte shadow usually looks more like depth than a warm bronzer, but the right depth depends on your skin and the light. Test a thin layer before adding a second.
The cheek release is the point where pressure leaves the brush. Release before the center of the eye, then blend the inner edge with a clean brush rather than adding more shadow there. The finished transition should disappear when you look straight ahead. If the line is still visible from arm's length, soften the release point before changing products.
Turn down at the jaw hinge
For the lower face, identify the jaw hinge just in front of the ear and follow the back edge of the jaw toward the chin. Stop well before the center. The goal is a short directional trace that repeats the shadow already present below the cheekbone, not a continuous outline around the face.
Keep the jaw trace lighter than the cheek trace. A common mistake is making both edges equally dark, which can frame the face too heavily. If the lower trace looks like a beard line, lift it slightly and shorten the endpoint. If it disappears in a three-quarter view, add a little more only where the jaw actually turns.
The chin stays mostly open. A small amount of shadow can sit under the chin if that area recedes naturally, but avoid painting a band across the front. Round-face contour works through interrupted edges: outer cheek, back jaw, and temple, with quiet space between them.
Keep the temple edge narrow
Use the same shadow at the upper temple and the outer forehead, starting at the hairline and blending inward for no more than the width of a fingertip. This edge should relate to the cheek corridor without becoming a forehead border. Stop before the brow, because a shadow that crowds the brow can pull the whole upper face down.
For contour for round face shape, the temple mark often does more useful work than a heavy jaw line. It gives the upper face a visible side without asking the center to become narrower. Blend upward and outward toward the hairline, then brush away excess with a clean brush.
Keep the center of the forehead free of contour unless the individual plane clearly needs it. The center light can stay subtle: a small amount on the bridge of the nose or the middle of the forehead may be enough. Do not highlight every point at full strength; the comparison between shadow and light is more important than the number of marks.
Separate contour from bronzer
Contour creates a shadow; bronzer adds warmth. They can sit on the same face, but they should not be applied as if they were the same product. Put contour where you want depth below the cheekbone or beside the jaw. Put bronzer higher and more broadly where sun would naturally warm the face. If the two products overlap completely, the result can look muddy and too dense.
Use a matte, low-reflectance finish for the contour. A shimmering product reflects light and works against the shadow effect. Cream can move with expression and is useful for dry or mature skin; powder can be easier to control on oily skin. Neither is automatically better. The test is whether the edge stays soft after ten minutes of wear.
Match the method to your face in motion
A still photograph can hide placement problems. Apply one side first and compare it with the bare side at rest, while speaking, while smiling, and in a slight three-quarter turn. The outer shadow should remain connected to the side of the face, and the inner edge should not move onto the center of the cheek when you smile.
If the contour looks too heavy, remove product with a clean brush before adding more blush. If it looks too wide, move the ear anchor slightly higher and shorten the cheek release. If the lower face looks shorter, reduce the jaw trace. If the upper face looks severe, soften the temple edge. Change one variable at a time so the next attempt has a useful comparison.
Take a front-facing photo with the same lens and light before testing another product. Look at the image at normal size, not zoomed into one cheek. The contour should read as a change in depth, not a separate graphic shape. A mirror check in indirect daylight is the final test before treating the map as repeatable.
Adapt the same map to the query you started with
The phrase contour for round face asian should not introduce a different face-shape rule based on ethnicity. Use the visible proportions, skin tone, texture, and lighting in front of you. The same ear anchor, cheek release, and jaw hinge can be adjusted in opacity and undertone without making an ethnicity label do the work of a makeup decision.
For contour for round face double chin, keep the jaw trace short and place any under-chin shadow behind the front edge of the chin. Do not paint a band across the neck. For contour for round nose, switch to a small brush and use two short, faint side marks rather than one vertical stripe. The nose is a separate feature test, not a reason to darken the whole center of the face.
If you searched for contour for round chubby face, use the same corridor with less product and a softer release. The word describes a visible fullness, not a requirement for a hard line. If your result is close to another chart label, compare contour for round oval face and contour for round heart shaped face by looking at where the widest plane actually sits; keep the placement that follows that plane.
For contour for round face to look slim, reduce the width of the shadow before increasing the darkness. A narrower corridor usually looks cleaner than a dark bracket. For how to contour round face for beginners, start with one cheek, one temple, and one short jaw trace. Build the rest only after the first three marks survive the movement check.
Make blush and contour cooperate
Contour and blush can share a face without occupying the same route. Use the [blush placement guide](/blush-placement) to set a START, TURN, and STOP for color; use this page to set the shadow corridor. The blush can travel above or behind the contour, but its outer stop should not repeat the shadow line exactly. Leave a small quiet gap where the cheek changes direction.
If the cheek is already the strongest visible feature, keep blush closer to the middle of the cheek and contour closer to the ear. If the cheek plane is flatter, a little more light on the upper cheek can separate the two products. The pairing should describe two different jobs: color gives direction, while contour gives depth.
The [round-face makeup guide](/makeup-for-round-face) can help place the eyes, blush, and center light around this shadow map. Use the [face shape chart](/face-shape-chart) if the detector result is close to another shape, and compare glasses only after the makeup is finished; the [round-face glasses guide](/glasses-for-round-face-shape) shows how a bridge and lower rim can change which cheek area needs to stay quiet.
Choose a finish you can repair
Cream contour is easier to move in the first minute; powder contour is easier to build in thin layers. A damp sponge can soften a cream edge, while a clean fluffy brush can lift excess powder. Keep the tool you used for the first pass nearby. Rebuilding a soft edge with a clean tool is more reliable than trying to erase a hard mark with more foundation.
Set cream with a light powder only where the product tends to move. A full powder layer can flatten the skin and make the outer shadow look dull. If the finish catches texture, press rather than sweep. If it fades unevenly, compare the cheek and jaw separately; the two areas may need different amounts even when they use the same product.
Round-face contour questions
Where should contour start on a round face?
Start at the outer cheek near the top of the ear, then move a short distance under the cheekbone. Release the brush before the center of the eye and blend the inner edge with a clean tool. This keeps the darkest point beside the face rather than across the cheek.
Should contour go on the apples of a round face?
The apples are usually better left for blush or light. Contour belongs farther back where the face turns away from the viewer. If the cheek already has strong color, keep the contour behind it so the two products do not merge into one wide stripe.
How do I contour a round face without it looking dirty?
Use less product, choose a neutral matte shade that follows your skin depth, and stop the cheek shadow before it reaches the center. Blend the edges with a clean brush and check the result in indirect daylight. Muddy contour often comes from too much warm product, too wide a route, or overlapping blush and shadow.
Does contour for round face double chin require a full jaw outline?
No. Keep the jaw trace short, work near the hinge, and leave the front of the chin open. A small under-chin shadow can be tested separately. A continuous outline tends to make the lower face look heavier or shorter rather than more defined.
How many passes should a beginner use?
Start with one thin pass on the cheek and the temple, plus one short jaw trace. Check the face at arm's length in daylight, then add a second pass only where the side plane still needs separation. One repeatable layer is more useful than a full map built at once.
The best contour for a round face is not the darkest version. It is the version with a clear ear anchor, a released cheek edge, a short jaw turn, and enough open space for the center of the face to remain visible. Keep that corridor consistent, and adjust the amount rather than rebuilding the geometry every morning.